Labels

Monday 2 December 2019

Generating an XSD from a DTD (without the Generated Items Wizard)

Whilst trying to generate an XSD from a DTD in BizTalk I came across a problem.  The standard process of creating an XSD from a DTD is to add generated items and then select DTD from the list (provided the dropdown option does not have “Not Loaded” next to it) and then point the wizard at the appropriate DTD file in order to create the schema (XSD).  This usually ends up building more than one XSD and you have to manually glue them together.  However using BizTalk Server 2016 even with the latest Feature Pack update (with CU 6), the process errors.

A way around this problem is to use the XML tools within Visual Studio :-

Open your DTD file in Visual Studio

Next go to the XML menu (Green arrow in the image below) on the Toolbar and select Create Schema (Blue arrow in the image below)


Immediately after in the same pane as your DTD, you will see a number of other tabs appear, these are the XSDs that have been generated from your DTD.  


By default these are created in the following directory … C:\Users\[your username]\AppData\Local\Temp, so you will need to add them into your schema project and then link them together using the import schema functionality.  

Also due to the way the XSDs are created you will need to find the root node in the controlling schema and move it to the top of the node list …. This will enable to generate an XML instance for testing etc 

Wednesday 27 November 2019

Cannot perform encryption or decryption because the secret is not available from the master secret server

There are a couple of reason why this might happen.  The first would be when the SSO Master Secret has been corrupted.

The first indication of this is when you try and perform actions within the BizTalk Administration Console such as importing bindings, creating ports etc.

You will start seeing the following error (amongst others) :- Cannot perform encryption or decryption because the secret is not available from the master secret server in the event viewer.  You may be tempted at this point to restart the Enterprise Single Sign On Service on the BizTalk nodes …. don’t.

If there is a problem with SSO and you try to restart the service … it will also stop the host instances running on the server … if the Enterprise SSO service does not come back up …. the host instances will not restart and no messages will be processed through the system (or whichever specific nodes you have restarted the Enterprise SSO service on).

Before you restore the SSO Master Secret it might also be worth checking to see if there are any firewall rules preventing access to the SSO Master Instance from the BizTalk Application Server Nodes as this can also give the same error.

If an SSO Master Secret restore is required …… follow the process set out below

It is worth pointing out before you start the process that if you don’t not have an SSO Master Secret Backup or the password, you will not be able to do the restore, and your only other option will be to re-do the BizTalk configuration process.


Click the windows button at the bottom left of the screen on the machine that contains the Master Enterprise SSO instance
Type MMC


In the resulting console click File then Add / Remove snapin
From the snapin list click Enterprise Single Sign-On (Green arrow in the image below) and click the Add button (Blue arrow in the image below)


The Enterprise Single Sign-On snap-in should appear in the Selected Snap-Ins pane on the right (Green arrow in the below image)

Next click ok (Blue arrow in the below image)


Expand the Enterprise Single Sign-On tree node in the left hand pane (Green arrow in below image)


Left clicking the system option will give you details of the current SSO instance and will also tell you which machine the Master is on (Look for Master Secret Server in the table)


In order to Restore the Master secret from backup ……
Right click System tree node in the left hand pane and select Restore Secret


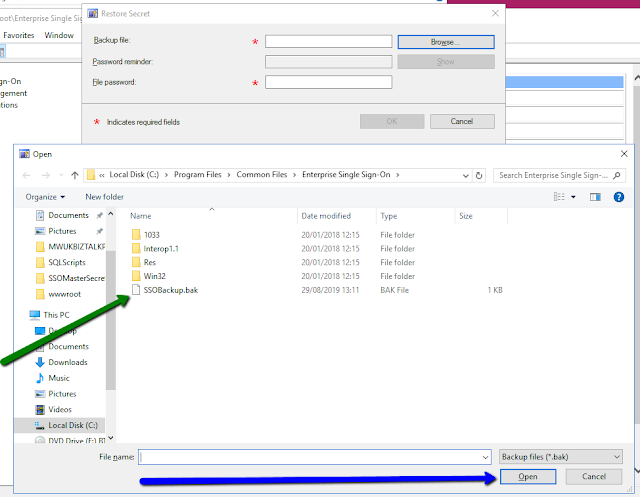
In the Backup file box click browse (Green arrow in below image)


Then navigate to the Master Secret backup file …. Usually located here :- C:\Program Files\Common Files\Enterprise Single Sign-On.  Click the backup file (Green arrow in below image).  Then click Open (Blue arrow in below image)


If one has been configured … click the Password reminder Show button (Blue arrow in image below) to get a hint of the password

Type the password in the File Password box (Green arrow in image below) then click OK (Orange arrow in image below)




Tuesday 19 November 2019

BizTalk Documenter 2013 R2 Walkthrough

BizTalk Documenter 2013 R2 Walkthrough  

For every version of BizTalk Server there is pretty much a version of the BizTalk documenter.  As it is (as is BizTalk Server) based on the .NET framework  
Information and installers can be found on links from this page https://archive.codeplex.com/?p=biztalk2013documenter (which will point to github resource https://github.com/mbrimble/biztalkdocumenter) 

In order to use the documenter, first download and install the version that is relevant to your version of BizTalk server. 

First click the windows button on the desktop and type “BizTalk documenter”.  The search box list all the matching programs … select BizTalk Documenter 2013R2 from the list. 


Server options 
The first screen to popup is the Server options screen.  On here in Management Server Name highlighted in purple you put in the server name where the BizTalk Server management databases are deployed (in this case ydevsql13).  In Management Database Name type in the name of the management database (usually BizTalkMgmtDb unless it is changed by the installer) 
If the rules engine is used for the application/s then click the Include Rules Engine Documentation checkbox and then (highlighted in green) give the servername where the rules engine is deployed and also the Database name. 
If you have any SystemConfig then click the ellipsis next to the ConfigFramework Output XML and select the location of the configxml file. 
When complete click the Output Options link at the bottom of the screen. (burgundy arrow) 


Output Options  
On this screen in the purple highlighted section.  In Report Title give the name of the file you would like creating.  In the Output Folder click the ellipsis and select the location where you would like the file created.  From the Output Provider dropdown select the Compiled Help option  (the word option does not work in the current release, check the GITHub repository for updates for a fix for this) 
If you have other documentation you want to include that is not part of the BizTalk application or current artifacts then you can add this by clicking the Advanced Documentation Options / Resource Folder ellipsis and selecting the location for the docs. 
Next click Select Document Scope (burgundy arrow) 


Select Documentation Scope 
In the options frame click Specific BizTalk Application and then from the appearing list tick the checkboxes next to the applications you want to document (bear in mind that if you select multiple applications they will all appear in the same document file.  If you wish to do have a separate document for each then select separately and then repeat the entire process for each application). 
Include referenced applications should be ticked by default.  If it is and you want to include referenced application artifacts … then click the checkbox. 
Next click Select Assemblies and Orchestrations (purple arrow) 


 Select Assemblies and Orchestrations 
Click the List Orchestrations link (green arrow) and from the resulting list, select the assemblies you would like to include in the documentation, this will select all orchestrations within that assembly.  If you wish to select only some of the available orchestrations then expand the list and select the specific ones you wish to include.   
Next click Select SSO Configuration (purple arrow) 


Select SSO Configuration 
Click the appropriate application from the application list available (in the red frame below).  Then under Advanced Documentation Options select the relevant ellipsis for STAGE, TEST and PROD SSO configuration (green arrows) and select the relevant file.  When complete click the Generate Documentation link (purple arrow) and then wait till generation is complete.